DropSpot Guide: Web

DropSpot User Guide
Contents
- He aha a DropSpot? | What Is DropSpot?
- Hei Tīmatanga | Getting Started
- Takiuru ki DropSpot | Log in to DropSpot
- Motuhēhēnga Āhuatanga Maha | Multi Factor Authentication Setup
- Papamahi Kaiaromatawai | Assessor Dashboard
- Arataki Whārangi (Kōwhiringa) | Page Tour
- Tuku Kōnae Hou | Upload a New File
- Tirohia Ngā Kōnae Kua Tukua | View Uploaded Files
- Tāpirihia Ngā Tūtohu Ritenga (Kōwhiringa) | Custom Tags
- Motuhēhēnga Āhuatanga Maha | Multi-Factor Authentication (MFA)
- Takiputa | Sign Out
He aha a DropSpot?
What Is DropSpot?
DropSpot is an evidence repository used by Te Mahi Ako to securely store completed paper-based assessment evidence. It provides a single, secure and trusted place for Assessors to upload and store ākonga evidence as part of their assessment storage and moderation requirements.
He aha āna whakamahinga?
What is DropSpot used for?
- Upload completed paper-based assessment materials
- Store assessment evidence to support reported credits
- Maintain clear, auditable assessment records
- Support quality assurance and moderation processes
Āhea me tuku ake?
When should Assessors upload?
Assessors are expected to upload evidence to Dropspot after reporting credits. This supports a clear assessment trail and ensures evidence is available at the point credits are reported. Assessors are expected to:
- mark the work in the workbook
- report the credit via their Assessor portal
- log into DropSpot and upload the scanned assessment workbook and any accompanying evidence
Mā wai a DropSpot?
Who is DropSpot for?
- Assessors – to upload and store completed assessment evidence
- Internal staff – to support moderation, review, and quality processes
- Te Mahi Ako – as a central evidence record linked to credit reporting
He aha ai a DropSpot
Why we use DropSpot
- Keep assessment evidence centralised and secure
- Support timely credit reporting with appropriate evidence
- Reduce risk by maintaining a clear audit trail
- Enable effective moderation and quality assurance
Hei Tīmatanga
Getting Started
- You will need a Multifactor-Authentication App
- If you haven't already got one, you will need to download and install one from the Play Store.
- We recommend the Microsoft Authenticator App: https://play.google.com/store/apps/details?id=com.azure.authenticator
How to Install MFA
- Open the App Store/Google Play on your device
- Search Microsoft Authenticator App
- Check that this is the genuine version published by Microsoft Corporation
- Alternatively you can download from the Microsoft Official download page here: https://support.microsoft.com/authenticator
- Select Install
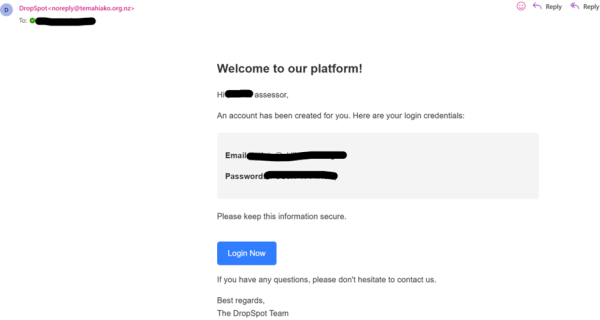
- Check your email
- DropSpot accounts will be created by Te Mahi Ako.
- You will receive an email from Te Mahi Ako which will contain your email address and password required for DropSpot login access.
Takiuru ki DropSpot
Log in to DropSpot
- Your welcome email will provide a link to our web version
- You may wish to save the web location to your favourites: http://tmadropspot.org.nz/
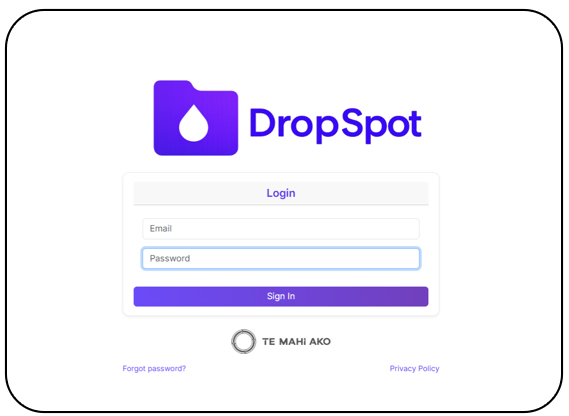
- Enter your username and password as per your welcome email.
- Select Sign in.
Motuhēhēnga Āhuatanga Maha
Multi Factor Authentication
The first time you log in you will need to set up Multi Factor Authentication
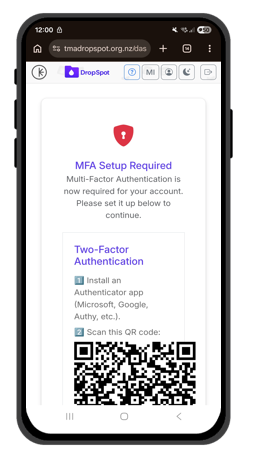
- Scroll down on your screen and copy the Unique Code below the QR Code
- Open your Authentication App
- It will ask you what type of Account you are adding — School/Work etc. Select personal.
- Name the account DropSpot
- It will provide you with the option to use QR Code or Unique Code
- Enter/Paste in your Unique Code
- DropSpot will now appear in your MFA App
- Copy the 6-Digit Generated Code
- It will ask you what type of Account you are adding — School/Work etc. Select personal.
- Go back to the DropSpot App
- Add the 6-Digit Generated Code
- Your MFA will now be complete (You will need this code each time you login)
Papamahi Kaiaromatawai
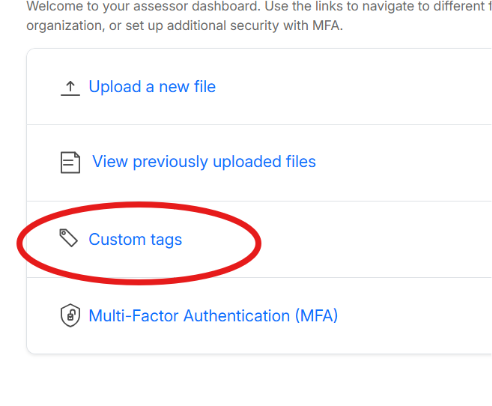
Assessor Dashboard
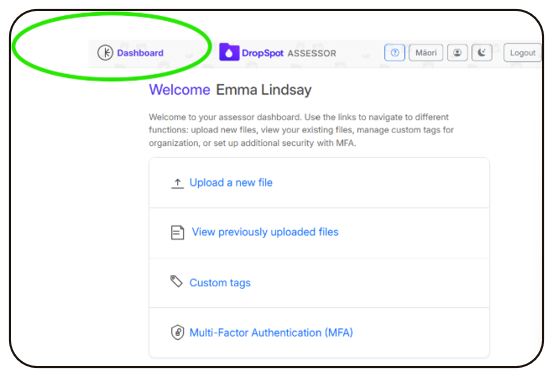
- You will enter DropSpot on the Assessor Dashboard
- From here you can Upload, View, Create Custom Tags and view your MFA. We will explore these in more detail soon. For now;
- Select the Settings Cog on the top right
Arataki Whārangi (Kōwhiringa)
Page Tour

On the top right of your screen you have some buttons:
- The Question Mark will give you a quick guide of your Dashboard.
- The Person Icon is your Profile
- Change your password
- Check MFA is enabled?
- Change language?
- The Moon lets you choose between Light or Dark Mode
- Logout is how you exit and close DropSpot
Our FAQs are located at the very bottom of your screen.
Click the Assessor Dashboard Icon to return here at any time.
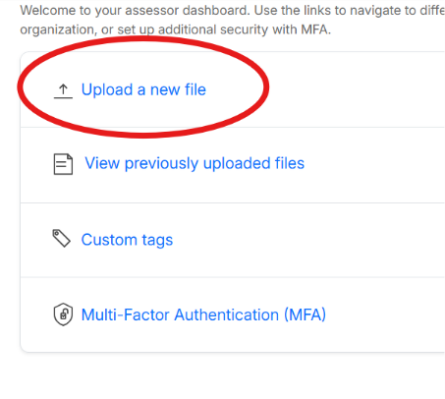
Tuku Kōnae Hou
Upload a New File
Select Upload a New File from the Assessor Dashboard
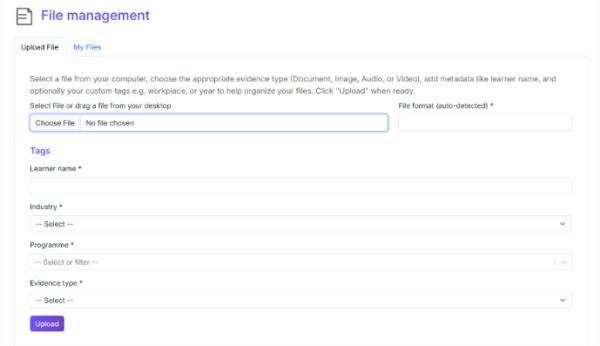
Select File Source
- Select Browse
- Choose a File saved on your device
- File Selected
- Confirm the correct File is selected
- Add your Tags
- Ākonga/Learner Name
- Industry
- Programme
- Evidence type
- Upload the File
- Select Upload
- Wait for the Upload Progress Bar to complete to confirm the Upload was successful
We highly recommend collating your files and photos so that you have one document per ākonga per programme to upload.
Check Out our Combining Documents & Photos Guide HERE
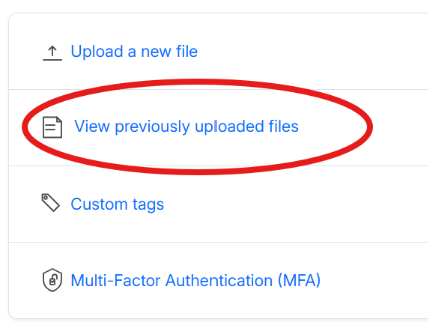
Tirohia Ngā Kōnae Kua Tukua
View Uploaded Files
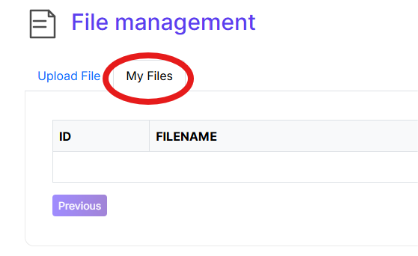
- From here you can:
- Check date and time uploaded
- Check your tags
- Preview, Download or Delete the File
- Select View previously uploaded files
- Select My Files
- Use the Search Field to locate the File you are looking for
- File Preview Icon
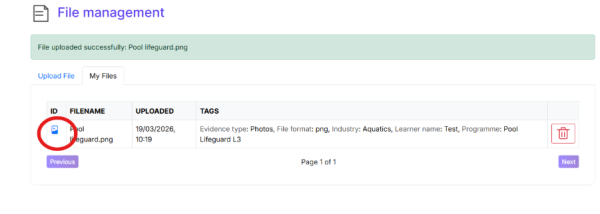
- If a Preview is available it will display upon clicking this Icon
- If a Preview is available it will display upon clicking this Icon
Tāpirihia Ngā Tūtohu Ritenga (Kōwhiringa)
Custom Tags
- Why create a Custom Tag?
- You can create personalised custom tags to help you locate and search for specific uploaded items.
- You can create up to 10 Custom Tags that are unique to you.
- Select Custom Tags from the Assessor Dashboard
- How to Create a Custom Tag
- Select New
- Enter your Tag Name — here are some examples you may wish to create:
- Workplace
- Known as name
- Role
- Business Unit/Department
- Choose your Custom Tag Type:
- Aa Free Text – This allows you to type as you wish for your naming conventions
- Select – This creates Options that you can list
- Required
- You can choose to turn ON or leave OFF "Make this tag required for file uploads"
- Once all fields have been entered you can press Create
- A Success Banner will appear — click OK
- Viewing & Editing Custom Tags
- Any created Custom Tags will appear within your Custom Tags section
- You can Delete using the Bin Icon or Edit using the Pencil Icon
Mōtuhēhēnga Āhuatanga Maha
Multi-Factor Authentication (MFA)
- Here you can confirm your MFA is enabled
- You also have the option to Disable MFA
Takiputa
Sign Out
- Select Logout located top right of the screen