DropSpot: Combining Assessment Material
How to Combine Assessment Material
The instruction guides below will help you put together documents, photos, or scanned items so that you end up with a single file for each ākonga assessment to upload to Dropspot.
- Ideally, Assessors will upload One file per ākonga assessment in Dropspot (combine documents, photos, or scans as needed)
- Uploaded files will have clear, consistent file naming
- All assessments are uploaded promptly once marking and credit reporting is completed
Benefits of combining files
While you can upload unlimited files to DropSpot, this could be very time consuming for you. Combining your assessment and evidence material into one file means that you only have to upload one item to DropSpot per ākonga. It also means you can search DropSpot and locate this material easily should you need to refer to it again in the future.
Benefits of DropSpot
Once assessment material is successfully loaded into DropSpot Assessors no longer have to store this physically or digitally elsewhere, it can be returned to the ākonga or securely destroyed.
For future moderation there will no longer be a rush to submit material on time as we will already have it stored. We will still notify you of the moderation occurring and reach out should we need additional information.
Contents
- Hei Tīmatanga | Getting Started
- Te Whakaingoa Kōnae | How to Rename a File (Windows or Mac)
- Te Whakaeminga Mauhanga | How to Combine Your Assessment Material
- Guide 1: Matawaitanga Mauhanga | Scanning Documents
- Guide 2: Combining Multiple Documents into One File (PDF)
- Guide 3: How to Combine Photos into One Document
Hei Tīmatanga
Getting Started
It is important as you work through the guides to combine your documents that you name your files with the correct naming convention. All files uploaded to Dropspot will ideally follow this format:
Module name_ākongafullname
Te Whakaingoa Kōnae
How to Rename a File (Windows or Mac)
- Right-click the file
- Select Rename
- Enter the correct file name (Module name_ākongafullname)
- Press Enter
Te Whakaeminga Mauhanga
How to Combine Your Assessment Material
The instruction guides below cover the following:
Guide 1: Scanning Documents into One File
Guide 2: Combining Multiple Documents into One File
Guide 3: Combining Photos into One Document
Guide 1: Scanning Documents
Scanning Documents using the OneDrive App
Use this guide if you have a OneDrive account to scan physical documents/photos into one file.
- Locate the OneDrive App
- Locate the "Blue +" icon at the bottom right of your screen.
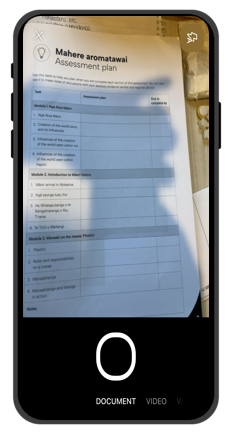
- This will take you to a new screen and allow you to capture a video or scan a document using your phone's camera.
- Hold your phone camera over your document or image, it can autocapture or you can use the white lines to mark out the document/image area.
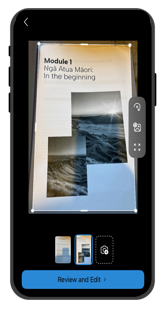
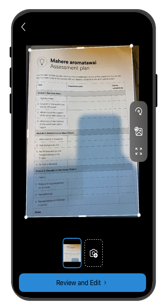
- Next you can Review and Edit or use the camera icon to add additional pages.
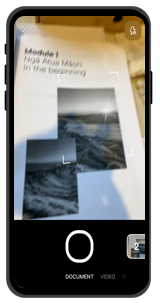
- The App will track the number of pages you have scanned on the righthand side.
- IMPORTANT NOTE: Depending on your OneDrive account type you may have a limit per scanning session.
- This is usually GB size versus number of pages.
- If this occurs scan documents as your file name with Part 1, Part 2 etc.
- Once you have scanned all your items (or as many as will allow) click Review and Edit.
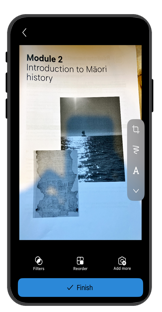
- From here you can add filters, re-order, add more or finish.
- Click Finish.
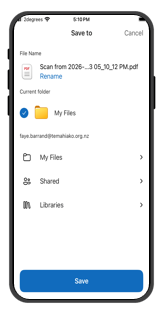
- A new screen will open. Click Save.
- Rename the file, you could use the ākonga name, programme and date for example.
- Once you are happy with the file name and location, click Save. A new screen will open and a blue "uploaded" banner will appear. Your file has successfully been saved.
- You can refer to our Combining PDFs Guide to merge these into one document (preferred option) or upload into DropSpot in parts.
Matawaitanga Mauhanga me Kūkara
Scanning Documents using Google Drive App
Use this guide if you have a Google Drive account to scan physical documents/photos into one file. 
- Locate the Google Drive App on your device.
- Click the "+" icon on the bottom right of your screen.
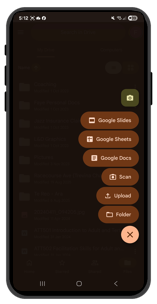
- Select Scan
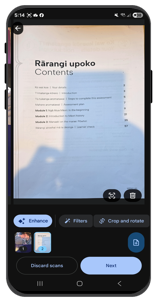
- You can select to scan using the Manual or Auto Capture options.
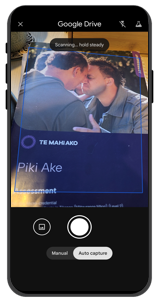
- You can edit your scan if you wish to, using the Enhance, Filters, Crop functions.
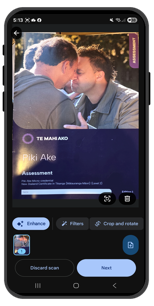
- To add your next page, select the darker blue Page Icon above the Next Button on the bottom right of your screen.
- IMPORTANT NOTE: Depending on your Google Drive account type you may have a limit per scanning session.
- This is usually GB size versus number of pages.
- If this occurs scan documents as your file name with Part 1, Part 2 etc.
- Once you have scanned all your items (or as many as will allow) click Next.
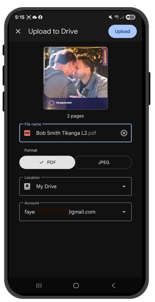
- Rename the file, you could use the ākonga name, programme and date for example.
- Ensure file type is PDF.
- Select where you would like to save the file to.
- Click Upload, located on the top right of the screen.
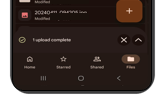
- An upload complete banner will appear.
- If you have had to create multiple PDFs to capture the full Assessment you can refer to our Combining PDFs Guides to further merge these into one document (preferred option).
- If this is not possible you can upload your Assessment Document into DropSpot in parts.
Matawaitanga Mauhanga me te Taupānga Notes
Scanning Documents using your iPhone Notes App
Use this guide to scan physical documents/photos into one file if you haven't got a OneDrive or Google Drive account but use an iPhone device.
|
|
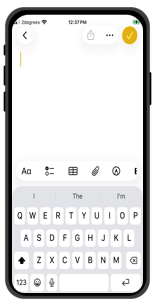
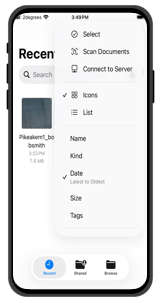
- Locate and open the Notes App on your iPhone
- Select the New Note Icon on the bottom right of your screen
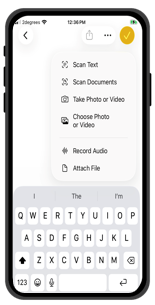
- Select the Paper Clip Icon
- Select Scan Documents
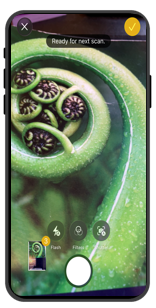
- Capture the first page of your document (hold your phone above the document, it will autocapture or you can press the white button)
- Repeat until you have captured your full document (or you reach a document limit)
- Select the Tick Icon located at the top right of your screen when you have finished scanning.
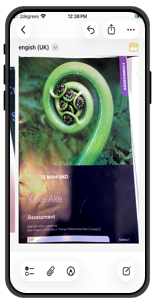
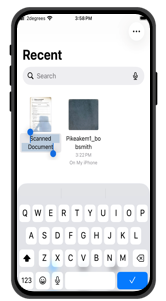
- You can preview your scanned document
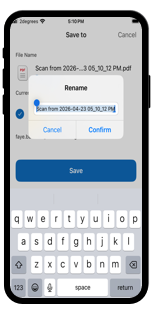
- Select the title "english (UK)" (this may be called something different on your device)
- From here Select Rename
- Name using the Naming Convention — Module name_ākongafullname
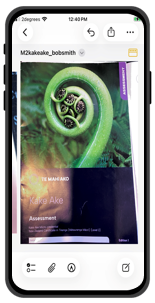
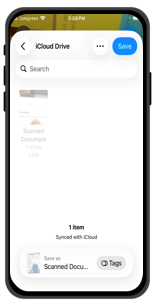
- Your chosen File Name will now appear above your scanned image.
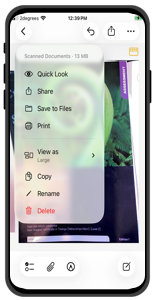
- Select the File Name again
- This time select Share or Save to Files.
- Share or Save to a location that you can access when using DropSpot.
Matawaitanga Mauhanga me te Taupānga Kōnae
Scanning Documents using your iPhone Files App
Use this guide to scan physical documents/photos into one file if you haven't got a OneDrive or Google Drive account but use an iPhone device.
- Locate and open the Files App on your iPhone
- Select the Three Dots on the top right of your screen
- Select Scan Documents
- Capture the first page of your document (hold your phone above the document, it will auto capture or you can press the white button)
- Repeat until you have captured your full document (or you reach a document limit)
- Select the Tick Icon located at the top right of your screen when you have finished scanning.
- Select Save
- From here Select Scanned Document
- Re-Name using the Naming Convention — Module name_ākongafullname
- Press the Blue Tick to save the new name
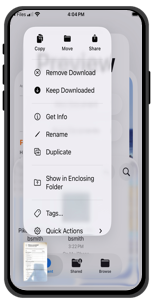
- Click your File Name until the menu appears
- This time select Share or Move.
- Share or Move to a location that you can access when using DropSpot.
Matawaitanga Mauhanga me te Pūrere Whakaahua
Scanning Documents the Old Way
A good quality scanner can also help to consolidate Assessment Materials.
You may have one at your workplace that could be used or local libraries often offer the use of their scanner for free!
If using this option scanned files are sent to you via email and can then be saved to your computer or device using the DropSpot Naming convention format, ready for uploading to DropSpot.
Guide 2: Combining Multiple Documents into One File (PDF)
On a Windows Computer (Using Microsoft Word)
This guide will show you how to combine documents, PDFs or photos to make one document.
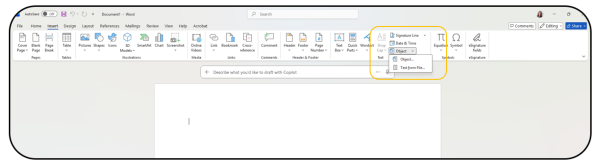
- Open Microsoft Word
- Select Blank document
- Go to Insert > Object > Text from File
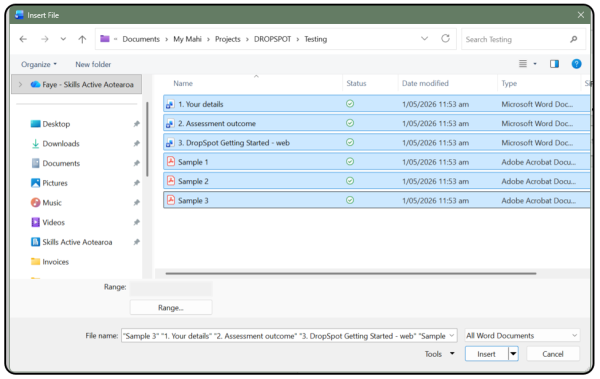
- Select all assessment documents
- Click on your first document then hold the CTRL key and select the other documents until all required documents are highlighted.
- Click Insert (documents will merge in order of selection)

- If you have selected PDFs you will get a pop up for each one to convert into an editable Word document. Click OK each time.
- Check your document is in order.
- To save this document select File
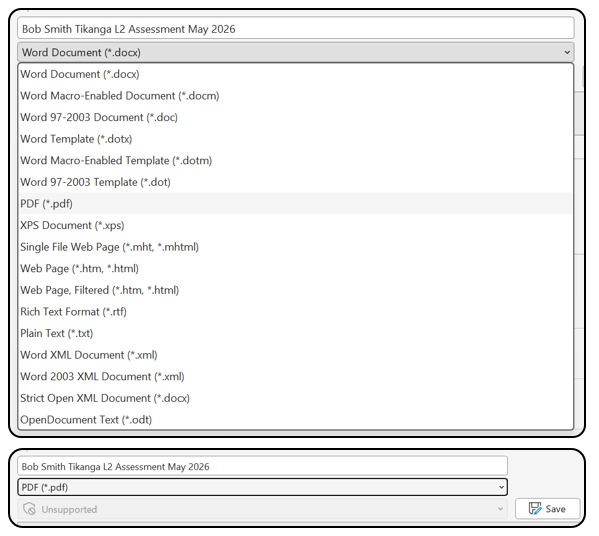
- Option one — click Save As
- Enter the file name you wish to use
- In the bar below use the down arrow on the far right and scroll down and select PDF.
- Check the save location is where you would like the document.
- Click Save
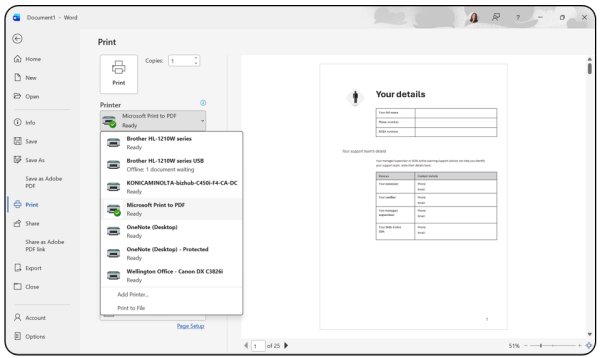
- Option 2 — click Print
- Select Microsoft Print to PDF in the Printer Dropdown menu
- Click Print
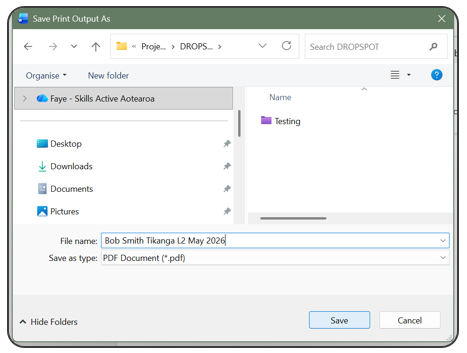
- Add File Name
- Select correct file location
- Click Save
- Option one — click Save As
- Your file is now a PDF and ready to upload to DropSpot.
Mā te rorohiko Windows
On a Windows Computer (Using Microsoft Edge – no paid Adobe required)
Use this option if you are working with PDF files and do not have paid Adobe software.
- Open your File Explorer
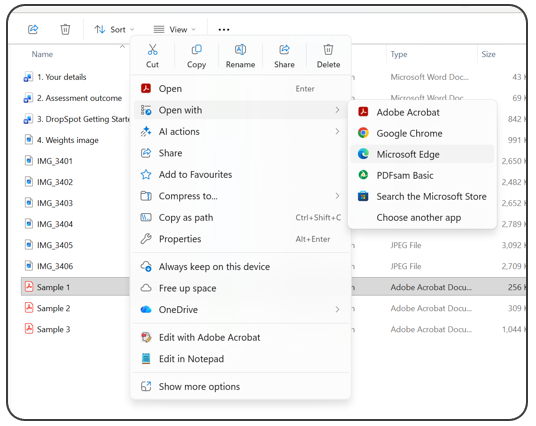
- Left Click on the PDF you would like to open
- Once highlighted Right Click on the same PDF
- Go to Open With and select Microsoft Edge
- Repeat this step for all the PDFs you wish to combine
- Your PDFs will open in Microsoft Edge as different tabs
- You can rotate them and adjust as you wish

- When you are ready Click on one of the tabs at the top
- Press and hold the CTRL key and select the other tabs in the order you would like them in your combined document.
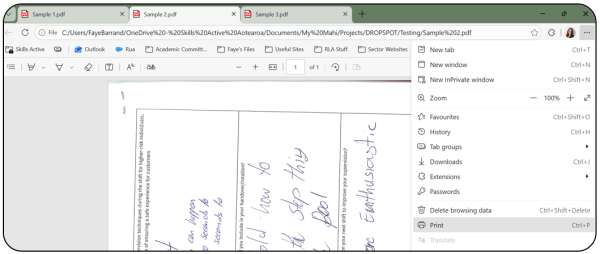
- Locate and Click the "..." at the top right of your screen
- Select Print
- Under Printer, select Microsoft Print to PDF.
- Check you are happy with the page order in the print preview. (Go back and re-select the tabs in a different order if you need to change this.)
- Select Print.
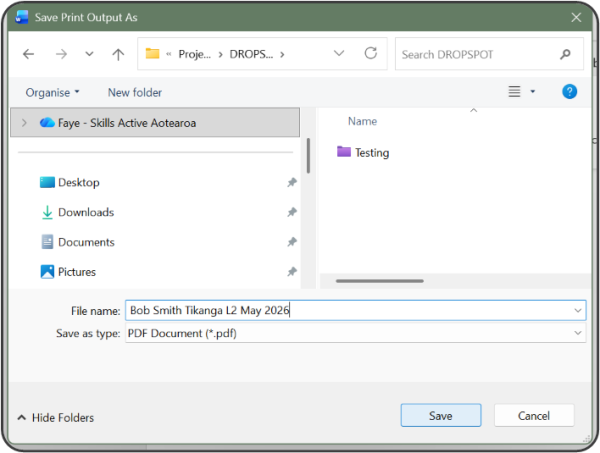
- Choose a file name and location, then select Save.
- Your file is now ready to upload to DropSpot.
Mā te Rauemi PDF
Using a Free Online PDF Tool (Any Device)
If none of the other options have worked for you, there are other FREE tools available. Please consider security before using and installing an external App or Tool. Here are some that we would support:
- Adobe Acrobat
- PDFSAM Basic
Using a Scanning App: Scanning Apps turn photos into a single PDF and are often easier than using a scanner.
Microsoft Lens (free)
- Available on iPhone and Android
- Automatically straightens pages and improves readability
Steps using Microsoft Lens
- Download and open Microsoft Lens
- Select Scan or Camera
- Take a photo of each page
- Select Add page after each photo
- When finished, select Done
- Save as PDF to your device
Recommended app: Adobe Scan (IT recommended)
Steps: Using Adobe Scan
- Download and open Adobe Scan on your phone or tablet
- Select the Camera or Scan button
- Take a photo of the first page of the assessment
- Check the page is clear, then select Keep Scan
- Select Add page and photograph the next page
- Repeat until all pages are scanned
- Select Save PDF
- Save the file to your device
Guide 3: How to Combine Photos into One Document
Option A: Using Microsoft Word or Google Docs
Use this guide when evidence is captured as photos (e.g. phone or tablet).
IMPORTANT NOTE: Before you get started you will need to be able to access your photos on a computer. An easy way to do this is to email them to an email address you can access on the computer, then download the images once received.
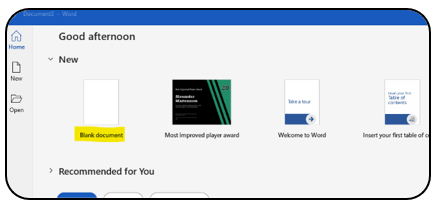
- Open Word or Google Docs
- Create a new blank document
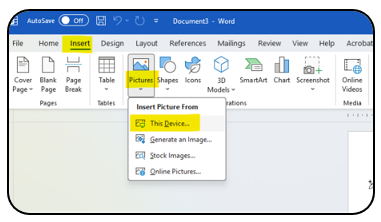
- Select Insert > Picture (or Insert > Image)
- Select This Device...
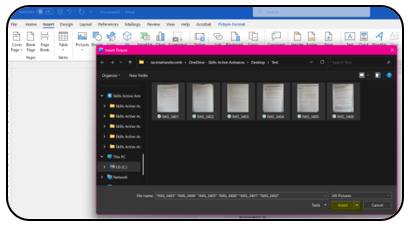
- Select photo(s) you wish to upload.
- To select multiple photos: select the first photo then press and hold down the Control key 'CTRL' and continue to select your photos.
- They will appear in the document in the order you select them.
- NOTE: If you wish your photos to be uploaded in a specific order please ensure photos have been saved with appropriate file names e.g. Task 1 pg 1, Task 1 pg 2, Task 1 pg 3 and so on.
- Click Insert
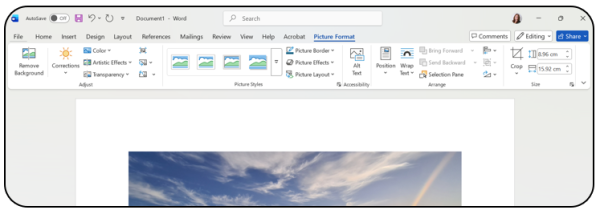
- Review your document and if you are happy with it, select File on the top left corner of your screen.
- Option one — click Save As
- Enter the file name you wish to use, for example Bob Smith Tikanga L2 Assessment May 2026
- In the bar below use the down arrow on the far right and scroll down and select PDF.
- Check the save location is where you would like the document.
- Click Save
- Option 2 — click Print
- Select Microsoft Print to PDF in the Printer Dropdown menu
- Click Print
- Add File Name
- Select correct file location
- Click Save
- Your file is now saved as a PDF and ready to upload to DropSpot.
Kōwhiringa B
Option B: On a Smartphone (iPhone or Android)
- Open your Photos / Gallery App (where your photos are located)
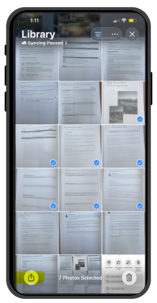
- Select the photos that you want to combine into one document
- Press the Share Icon located on the bottom left of your screen
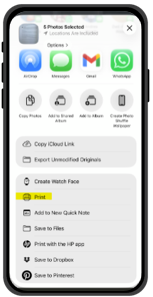
- Select Print (if you don't see Print straight away, tap More or More share options.)
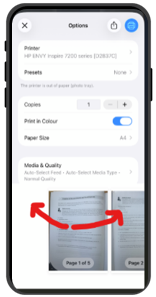
- Pinch outwards on the preview to create a PDF (using two fingers)
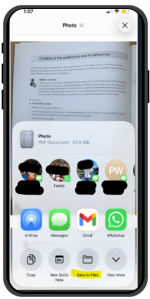
- Select Save to Files
- Use the DropSpot naming convention
- Your file is now ready to upload into DropSpot.
Note: Some Android phones do not show a Print / Save as PDF option when selecting multiple photos. If this option does not appear on your device, please use Microsoft Lens or Adobe Scan to combine photos into one PDF instead.